How to Shoot a Timelapse Video on Insta360 Pro 2 – Step by Step Guide
Learn how to capture stunning timelapse videos with Insta360 Pro 2. Step-by-step guide on location setup, lighting, frame calculation, battery preparation, and shooting tips for professional 360° timelapse.
INSTA 360 PRO2 CAMERA USES

🎥 How to Shoot a Professional 360 Timelapse Video on Insta360 Pro 2 – Step by Step Guide
Meta Description: Learn how to capture stunning $360 timelapse videos with Insta360 Pro 2. Step-by-step guide on critical manual settings, frame calculation, long-duration power setup, and shooting tips for professional {8K results.
🕰️ Introduction
Timelapse is one of the most stunning techniques in filmmaking. It allows you to compress hours of action into just a few seconds, creating a magical effect. If you own an Insta360 Pro 2, you can capture breathtaking 360 timelapse videos for documentaries, events, or even cityscapes. But to get it right, you need proper planning, precise manual settings, and frame calculation.
In this guide, Viral Gala of 360 vr photography will walk you through the essential steps to shoot a professional $\text{8K}$ timelapse on the $\text{Insta360 Pro 2}$.
📍 Step 1: Decide Location and Scene (The Dynamic Element)
The most important part of a timelapse is the location. Choose a place where movement is continuous:
High Movement: Clouds, traffic, busy city junctions, water flow.
Environmental Change: Sunset/Sunrise (Day-to-Night, or Holy Grail timelapse).
The Best Cinematic Feel: Target the Golden Hour (soft golden light) or even Blue Hour for dramatic evening cityscapes.
🌅 Step 2: Select Time Slot & Plan Duration
Decide your shooting window in advance. For a smooth, complete t{Day-to-Night} transition, you may need to shoot for $2$ to $4$ hours of raw footage. Accurate calculation is key to avoid running out of battery or storage.
🔋 Step 3: Prepare the Powerhouse & Stability
The {Pro 2} is a professional tool that demands professional readiness.
Continuous Power is Key: For long shoots (over an hour), do not rely solely on the internal batteries. Use the {DC}$ power adapter or a high-capacity external power bank.
Memory Management: Format all seven memory cards ({6 Micro-SD + 1 SD}$) before starting. footage consumes space rapidly.
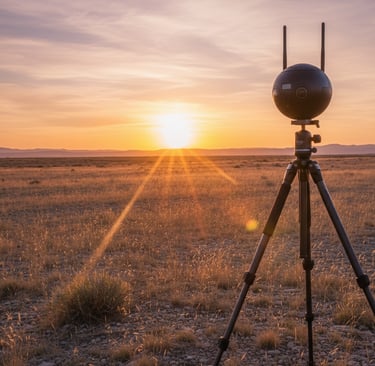
Rock-Solid Stability: Mount the camera on a heavy-duty, professional-grade tripod to counteract wind or accidental vibrations. Ensure the horizon is perfectly level before starting.
🎥 Step 4: Set Critical Manual Settings (Avoid Flicker!)
This is the most crucial step for professional results. Never use Auto settings for a timelapse, as flickering will occur due to inconsistent exposure between frames.
SettingRecommendationRationaleMode$\text{Timelapse}$ (or $\text{Interval Photo}$ for advanced control){Timelapse}$ mode automatically compiles the video.Resolution$\text{8K}$Maximum quality for reframing options in post-production.Frame Rate{24 fps}$Standard cinematic look for the final video.Exposure ModeManual (M)CRITICAL: Locks in settings to eliminate flicker.Shutter SpeedFixed (e.g., $1/2$ second or $1/4$ second)Use a slower shutter speed (if possible) to introduce motion blur for smoother movement in the final video (e.g., smoother traffic trails).ISO & White BalanceFixed {e.g., ISO 100}$)Lock the ISO to the lowest possible setting {e.g., ISO 100}$) to minimize noise. Lock the White Balance to prevent color temperature shifts.Interval{1 to 5 seconds}$Depends on movement speed (see calculation below).
👉 Calculation Example: Planning Your Shoot
You must calculate the total frames needed based on your desired final video duration:
{Total Frames Required} = \text{Final Video Duration (seconds)} \times \text{Frame Rate (fps)}$$
If you want a {30-second}$ timelapse at {24 fps}
$\text{Total Frames Required} = 30 \times 24 = 720$ frames.
At an Interval of $\text{2 seconds}$ per frame: You need $720 \times 2 = 1,440$ seconds.
$\text{Total Recording Time} = 1,440 \text{ seconds} = \text{24 minutes}$ of recording.
Plan your shoot duration and interval settings before you step on set.
⏳ Step 5: Start Shooting (Final Checks)
Secure the $\text{Setup}$: Lock tripod legs. Use sandbags if shooting in windy conditions.
Clear the Frame: Ensure you and your crew are out of the frame! Hide behind a large object or remotely start the recording.
The Wait: Start recording and let the camera run continuously. Never touch or move the tripod once recording has started.
🖥️ Step 6: Post-Processing for Impact
Stitch Professionally: Import your footage into Insta360 Stitcher (or Studio) for accurate $\text{360}^{\circ}$ assembly.
Exposure Correction: If you shot a Day-to-Night timelapse, use software like Adobe Premiere Pro or specialized tools to smooth out any remaining exposure shifts (de-flicker).
Color Grading: Adjust the exposure and color grade for a dramatic, professional effect.
Reframing: One of the biggest advantages of timelapse is the ability to "reframe" a final $16:9$ video from the $360^{\circ}$ sphere in post-production, adding camera movements (zooms, pans) for a dynamic final shot.
✅ Tips for Better Timelapse
ND Filters: For bright daytime shots, use Neutral Density filters to slow down the shutter speed, introducing the critical motion blur that makes timelapse smooth and professional.
Test Run: Always do a short test run with your final settings to check for noise, flicker, and proper exposure before committing to a multi-hour shoot.
📌 Conclusion
Shooting a professional timelapse with the Insta360 Pro 2 is all about preparation and manual control. With the right location, precise calculations, and locked-in settings, you, Viral Gala, can create magical visuals that leave your audience amazed.
Need a professional team for your next project? Contact 360 vr photography today.
Call Viral Gala: 9920322366
Explore Our Work: 360vrphotography.com or 360vrphotography.in
📺 Recommended Video Tutorial
This video gives a clear visual guide on the post-production process, which is essential after capturing your perfect timelapse frames:
TitleChannelRelevanceInsta360 Pro 2 Tutorial – Stitching Timelapses in StitcherInsta360 TutorialsWalks through the critical stitching and export process, including $\text{8K}$ settings.URLhttp://www.youtube.com/watch?v=PlHoWZ7rFnE

Experience
Engaging virtual tours for real estate and events.
Innovative
Immersive
info@360vrphotography.in
+91 9920322366